https://www.kaggle.com/c/digit-recognizer
Digit Recognizer
Learn computer vision fundamentals with the famous MNIST data
www.kaggle.com
Competition Description
In this competition, your goal is to correctly identify digits from a dataset of tens of thousands of handwritten images.
Data Description
The data files train.csv and test.csv contain gray-scale images of hand-drawn digits, from zero through nine.
Each image is 28 pixels in height and 28 pixels in width, for a total of 784 pixels in total. Each pixel has a single pixel-value associated with it, indicating the lightness or darkness of that pixel, with higher numbers meaning darker. This pixel-value is an integer between 0 and 255, inclusive.
먼저 Google Drive에 압축파일을 업로드 한후, 마운트 한다. 그다음 코랩 노트북에서 압축파일을 푼다.
!unzip -qq '/content/drive/MyDrive/digit-recognizer.zip'
필요한 모듈들을 임포트한다.
import os
import cv2
import matplotlib.pyplot as plt
import pandas as pd
import numpy as np

from sklearn.model_selection import train_test_split
train,test 파일을 csv 파일로부터 불러온다.
train=pd.read_csv('/content/train.csv')
test=pd.read_csv('/content/test.csv')
train.info()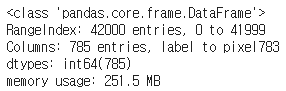
42000장의 이미지가 있고 785개의 Columns 가 존재한다. 첫번째 Colums은 label 이고 나머지는 각 픽셀의 정보이다.
test.info()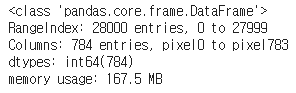
28000장의 이미지가 있고 각 픽셀의 정보만 열로 존재한다.
train['label'].value_counts()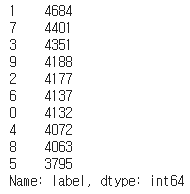
y_train=train['label']
y_train을 원핫 인코딩해준다.
from keras.utils.np_utils import to_categorical
y_train=to_categorical(y_train,num_classes=10)
x_train에서 label 열을 제외해 준다.
x_train=train.drop(labels=['label'],axis=1)
x_train, test 데이터에 null값이 있는지 알아본다.
x_train.isnull().any().describe()
test.isnull().any().describe()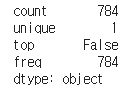
이미지 픽셀값들을 정규화 시켜준다.
x_train=x_train/255.0
test=test/255.0
이미지 정보들이 1차원으로 되어 있으므로 ndarray로 바꿔준다.
x_train=x_train.values.reshape(-1,28,28,1)  #ndarray 로 바뀜
test=test.values.reshape(-1,28,28,1)

x_train.shape  #(42000, 28, 28, 1)
이제 합성곱 신경망을 구성해준다. 그 전에 데이터들을 섞어주고 데이터를 확인해보자.
from keras.models import Sequential
from keras.layers import Dense,Dropout,Flatten,Reshape,Conv2D,MaxPool2D
from keras.preprocessing.image import ImageDataGenerator
import tensorflow as tf

x_train,x_val,y_train,y_val=train_test_split(x_train,y_train,test_size=0.1)
plt.imshow(x_train[0][:,:,0],cmap='gray')  #(28,28,1)를 (28,28)로 바꿔줘야한다.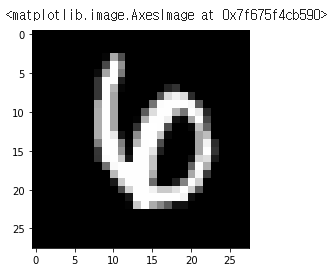
y_train[0]
이미지와 레이블이 잘 맞는것을 확인할 수 있다.
이제 합성곱 신경망을 만들어보자.
model=Sequential([
                  Conv2D(64,3,activation='relu',input_shape=(28,28,1)),
                  MaxPool2D(2,2),
                  Conv2D(128,3,activation='relu'),
                  MaxPool2D(2,2),
                  Flatten(),
                  Dropout(0.5),
                  Dense(100,activation='relu'),
                  Dense(10,activation='softmax')
])
model.summary()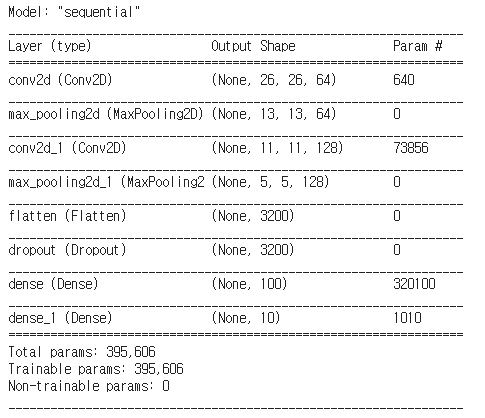
model.compile(loss='categorical_crossentropy',metrics='accuracy')
history=model.fit(x_train,y_train,
                  batch_size=64,
                  validation_data=(x_val,y_val),
                  epochs=20)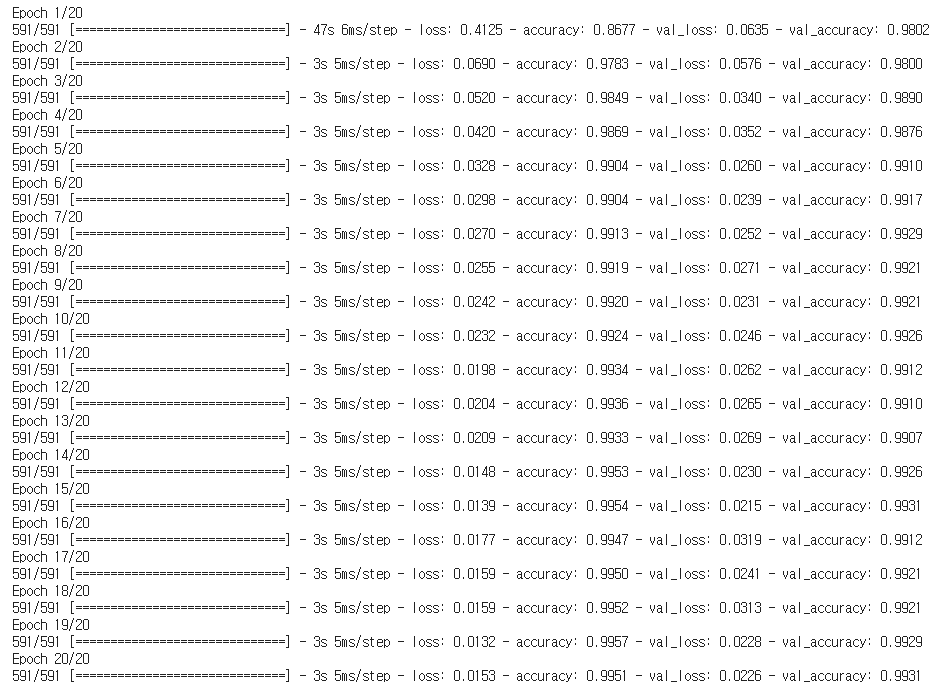
history 객체를 반환해서 손실 그래프를 그려볼 수 있다.
print(history.history.keys())
plt.plot(history.history['loss'])
plt.plot(history.history['val_loss'])
plt.xlabel('epoch')
plt.ylabel('loss')
plt.legend(['train','val'])
plt.show()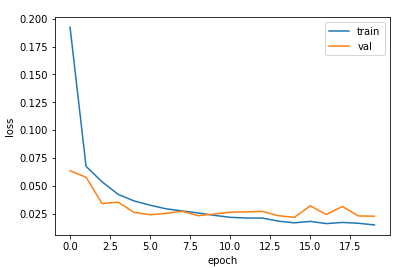
과대, 과소적합 없이 잘 학습된것을 확인할 수 있다.
이제 잘못 예측한 경우들을 살펴보자.
y_pred=model.predict(x_val)             # 이미지당 각 레이블들의 확률을 계산해서 반환해줌
y_pred_classes=np.argmax(y_pred,axis=1)  # 예측 레이블
y_true=np.argmax(y_val,axis=1)           # 진짜 레이블

errors=(y_pred_classes - y_true !=0)          #[False False False ... False False False]
y_pred_classes_errors=y_pred_classes[errors]  # 에러가 발생한 이미지들의 레이블
# array([2, 7, 3, 7, 7, 2, 5, 7, 1, 8, 6, 1, 2, 2, 5, 7, 6, 8, 6, 9, 1, 9,
       3, 6, 7, 7, 4, 7, 0])

y_pred_errors=y_pred[errors]  # 에러가 발생한 이미지들의 각 레이블들의 확률을 계산해서 반환
y_true_errors=y_true[errors]  # 에러가 발생한 이미지들의 진짜 레이블
# array([6, 9, 5, 2, 2, 0, 3, 3, 2, 5, 8, 2, 1, 4, 6, 2, 0, 7, 5, 3, 7, 5,
       2, 4, 9, 9, 9, 2, 8])

x_val_errors=x_val[errors]  # 에러가 발생한 이미지들
_,axs=plt.subplots(7,4,figsize=(15,15),)
plt.subplots_adjust(hspace=0.4,wspace=-0.5)
i=0
for i in range(7):
for j in range(4):
num=i*4 +j
if num>len(x_val_errors):
break
axs[i,j].imshow(x_val_errors[num][:,:,0],cmap='gray')
axs[i,j].axis('off')
axs[i,j].set_title('prediction:{},answer:{}'.format(y_pred_classes_errors[i],y_true_errors[i]))
plt.show()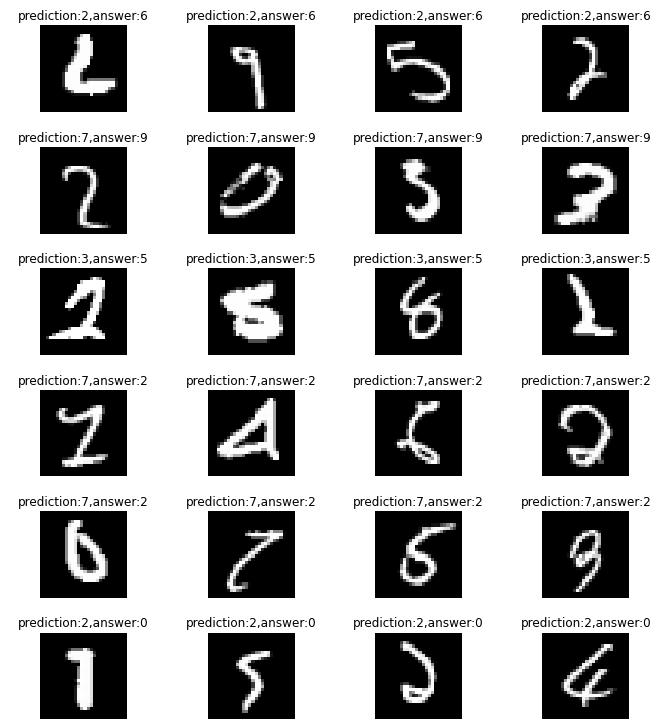
마지막으로 test 세트로 모델을 평가한후 그 결과를 csv파일로 저장한다.
results=model.predict(test)
results=np.argmax(results,axis=1)
results=pd.Series(results,name='Label')

submission=pd.concat([pd.Series(range(1,28001),name='ImageId'),results],axis=1)
submission.to_csv('cnn_mnist_data.csv',index=False)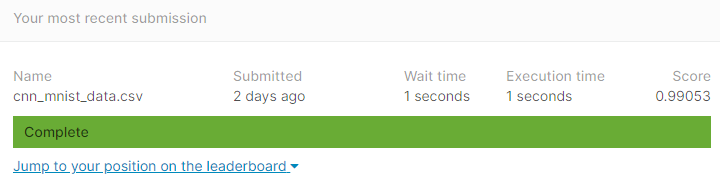
'Kaggle' 카테고리의 다른 글
| Animal - 10 분류 - pytorch (0) | 2021.11.27 |
|---|---|
| 이미지 분류(이진 분류) (0) | 2021.07.06 |
| notMNIST (0) | 2021.06.13 |