이번 포스팅에서는 yolov3를 이용해 object detection을 하는 방법에 대해 정리해보겠다. 여기서는 사전학습된 weights 를 가지고 객체탐지를 실행했다. 코드 설명은 주석마다 잘 설명해놓았다.
1. 이미지 객체 인식
import cv2
import numpy as np

min_confidence=0.5

# Load yolo
net=cv2.dnn.readNet('yolov3.weights','yolov3.cfg')
classes=[]
with open('coco.names','r') as f: # 파일을 읽어와 f에 두고
    classes=[line.strip() for line in f.readlines()] # 이름 파일의 이름들이 배열에 들어감

# yolo의 작동 방식
layer_names=net.getLayerNames()
output_layers=[layer_names[i[0]-1] for i in net.getUnconnectedOutLayers()]

colors=np.random.uniform(0,255,size=(len(classes),3)) # 각각의 클래스들의 색을 다르게 표현


#Loading image
img=cv2.imread('image_01.jpg')
#img=cv2.resize(img,None,fx=0.4,fy=0.4) #사이즈를 0.4만큼 줄임
height,width,channels = img.shape
cv2.imshow('Original image',img)

#Detecting objects
#(416,416) 사이즈로 이미지를 만들어준다. -> 스피드와 정확도가 둘다 적당하다.
blob=cv2.dnn.blobFromImage(img,1/255.,(416,416),(0,0,0),True,crop=False)

net.setInput(blob)
outs=net.forward(output_layers) #어던 물체를 detect했는지에 대한 정보가 들어있다.

# Showing informations on the screen
class_ids=[]
confidences=[]
boxes=[]

for out in outs:
    for detection in out:

        scores=detection[5:]
        class_id=np.argmax(scores)
        confidence=scores[class_id]
        if confidence>min_confidence:
            # Object detected
            center_x=int(detection[0] * width)
            center_y=int(detection[1] * height)
            w=int(detection[2] * width)
            h=int(detection[3] * height)

            #  Rectangle coordinates
            x=int(center_x - w / 2)
            y=int(center_y - h / 2)

            boxes.append([x,y,w,h])
            confidences.append(float(confidence))
            class_ids.append(class_id)


indexes=cv2.dnn.NMSBoxes(boxes,confidences,min_confidence,0.4)
# 여러개의 박스가 생기는데 이중 하나의 박스로 줄여준다.min_confidence=> confidence의 임계값 0.4=>NMS의 임계값, boxes안에 몇번째 box가 유의미 한지 인덱스 넘겨줌
font=cv2.FONT_HERSHEY_PLAIN


for i in range(len(boxes)): #모든 boxes중 NMS에 의해 기록된 유의미한 인덱스만 골라내기 위한 과정
    if i in indexes: # 유의미한 인덱스가 걸리게 되면
        x,y,w,h=boxes[i]  # 유의미한 box
        label=str(classes[class_ids[i]]) #classes[index of class]
        print(i,label)
        color=colors[i]
        cv2.rectangle(img,(x,y),(x+w,y+h),color,2)
        cv2.putText(img,label,(x,y),font,2,(0,255,0),1)

cv2.imshow('image',img)
cv2.waitKey(0)
cv2.destroyAllWindows()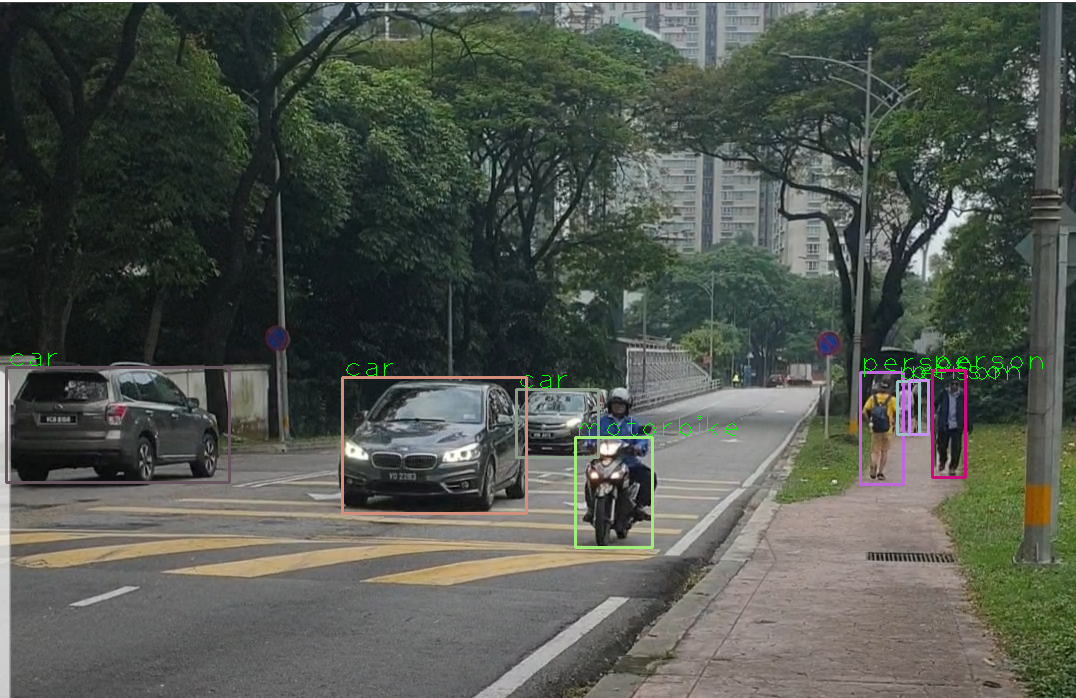
2. 동영상 객체 인식
이미지 인식때 사용했던 main code들을 함수화 시켰다. 영상을 불러와야 하기 때문에 이렇게 처리하는 편이 더 깔끔하다.
import cv2
import numpy as np
import time

file_name='video_01.mp4'
min_confidence=0.5

def detectAndDisplay(frame):
    start_time=time.time()

    img=cv2.resize(frame,None,fx=0.4,fy=0.4) #사이즈를 0.4만큼 줄임
    height,width,channels = img.shape
    cv2.imshow('Original image',img)

    #Detecting objects
    #(416,416) 사이즈로 이미지를 만들어준다. -> 스피드와 정확도가 둘다 적당하다.
    blob=cv2.dnn.blobFromImage(img,1/255.,(416,416),(0,0,0),True,crop=False)

    net.setInput(blob)
    outs=net.forward(output_layers) #어던 물체를 detect했는지에 대한 정보가 들어있다.

    # Showing informations on the screen
    class_ids=[]
    confidences=[]
    boxes=[]

    for out in outs:
        for detection in out:

            scores=detection[5:]
            class_id=np.argmax(scores)
            confidence=scores[class_id]
            if confidence>min_confidence:
                # Object detected
                center_x=int(detection[0] * width)
                center_y=int(detection[1] * height)
                w=int(detection[2] * width)
                h=int(detection[3] * height)

                #  Rectangle coordinates
                x=int(center_x - w / 2)
                y=int(center_y - h / 2)

                boxes.append([x,y,w,h])
                confidences.append(float(confidence))
                class_ids.append(class_id)

    indexes=cv2.dnn.NMSBoxes(boxes,confidences,min_confidence,0.4)
    # 여러개의 박스가 생기는데 이중 하나의 박스로 줄여준다.min_confidence=> confidence의 임계값 0.4=>NMS의 임계값, boxes안에 몇번째 box가 유의미 한지 인덱스 넘겨줌
    font=cv2.FONT_HERSHEY_PLAIN


    for i in range(len(boxes)): #모든 boxes중 NMS에 의해 기록된 유의미한 인덱스만 골라내기 위한 과정
        if i in indexes: # 유의미한 인덱스가 걸리게 되면
            x,y,w,h=boxes[i]  # 유의미한 box
            # 이름과 몇퍼센트 확률인지 보여준다.
            label='{}: {:.2f}'.format(classes[class_ids[i]],confidences[i] * 100) #classes[index of class]
            print(i,label)
            color=colors[i]
            cv2.rectangle(img,(x,y),(x+w,y+h),color,2)
            cv2.putText(img,label,(x,y-5),font,1,color,1)

    end_time=time.time()
    process_time=end_time - start_time
    print('A frame took {:.3f} seconds'.format(process_time))
    cv2.imshow('YOLO image',img)


# Load yolo
net=cv2.dnn.readNet('yolov3.weights','yolov3.cfg')
classes=[]
with open('coco.names','r') as f: # 파일을 읽어와 f에 두고
    classes=[line.strip() for line in f.readlines()] # 이름 파일의 이름들이 배열에 들어감

# yolo의 작동 방식
layer_names=net.getLayerNames()
output_layers=[layer_names[i[0]-1] for i in net.getUnconnectedOutLayers()]

colors=np.random.uniform(0,255,size=(len(classes),3)) # 각각의 클래스들의 색을 다르게 표현

# Read the video stream
cap=cv2.VideoCapture(file_name)
if not cap.isOpened:
    print('--ERROR opening video capture')
    exit(0)
while True:
    ret,frame=cap.read()
    if frame is None:
        print('! No captured frame --Break!')
        break
    detectAndDisplay(frame)
    # hit 'g' on the keyboard to quit!
    if cv2.waitKey(1)==27:
        break
'Object Detection' 카테고리의 다른 글
| Custom YOLO project - 대용량 xml파일 라벨링 해주기 (0) | 2021.08.21 |
|---|---|
| Custom YOLO project - YOLO 이미지 데이터 만들기 (0) | 2021.08.21 |
| 졸음 감지 프로젝트 (0) | 2021.08.16 |
| face_aligned_photo_generator (0) | 2021.08.16 |
| face alignment (0) | 2021.08.15 |